27. Agentic Integration
Cytoscape has always been drivable from outside its own user interface. The Commands feature, the CyREST interface layer, and the RCy3 and py4cytoscape packages all let another program open networks, apply layouts, change styles and export results — see Cytoscape Automation.
An AI agent is a new kind of client for that same surface. Instead of a script that names an exact command and its arguments, the caller is a large language model (LLM) that reads a description of what Cytoscape can do, works out which operations your request implies, and runs them in sequence. What changes for you is the interface, not the application: you describe an intent — “load this network and colour the nodes by degree” — and the agent translates it into the operations Cytoscape already offers. Cytoscape remains where the result is drawn, inspected and saved.
This is an active and fast-moving area, and the pieces described in this chapter are explicitly experimental. Expect the details to change between releases.
Cytoscape ships agent-ready, but not agent-enabled. Nothing in this chapter works on a stock installation. The capability is delivered by an optional app from the Cytoscape App Store (https://apps.cytoscape.org), which you must install yourself. The rest of this chapter covers that app: how to install and connect it, what it provides, and how to work with an agent once it is running.
27.1. Installation
The Cytoscape MCP Server is not bundled with Cytoscape, so none of this chapter applies until you install it.
Cytoscape 3.10 or above.
An MCP-capable AI client that supports the Streamable HTTP transport — for example Claude Desktop, Claude Code, GitHub Copilot or OpenAI Codex CLI.
An internet connection, if you want to load networks from NDEx.
The app has one runtime property, editable at Edit → Preferences → Properties → cytoscapemcp:
| Property | Default | Description |
|---|---|---|
| mcp.ndexbaseurl | https://www.ndexbio.org | Base URL of the NDEx server that network-loading tools read from. Change it to point at a private or internal NDEx instance. Takes effect immediately — tool calls read it at invocation time, so no restart is needed. |
Installing the app
Install Cytoscape MCP Server from its Cytoscape App Store page:
Click Install there and Cytoscape will pick the app up. Restart Cytoscape if prompted. Once it has started, the app is running when the MCP button appears in the status bar with a green label.
Finding your MCP URL
Everything an agent needs is one URL:
http://localhost:{rest.port}/mcp
where {rest.port} is Cytoscape’s CyREST port. That is 1234 unless you
changed it under Edit → Preferences → REST API. Rather than assembling the
URL yourself, click the MCP button in the bottom-left status bar — the
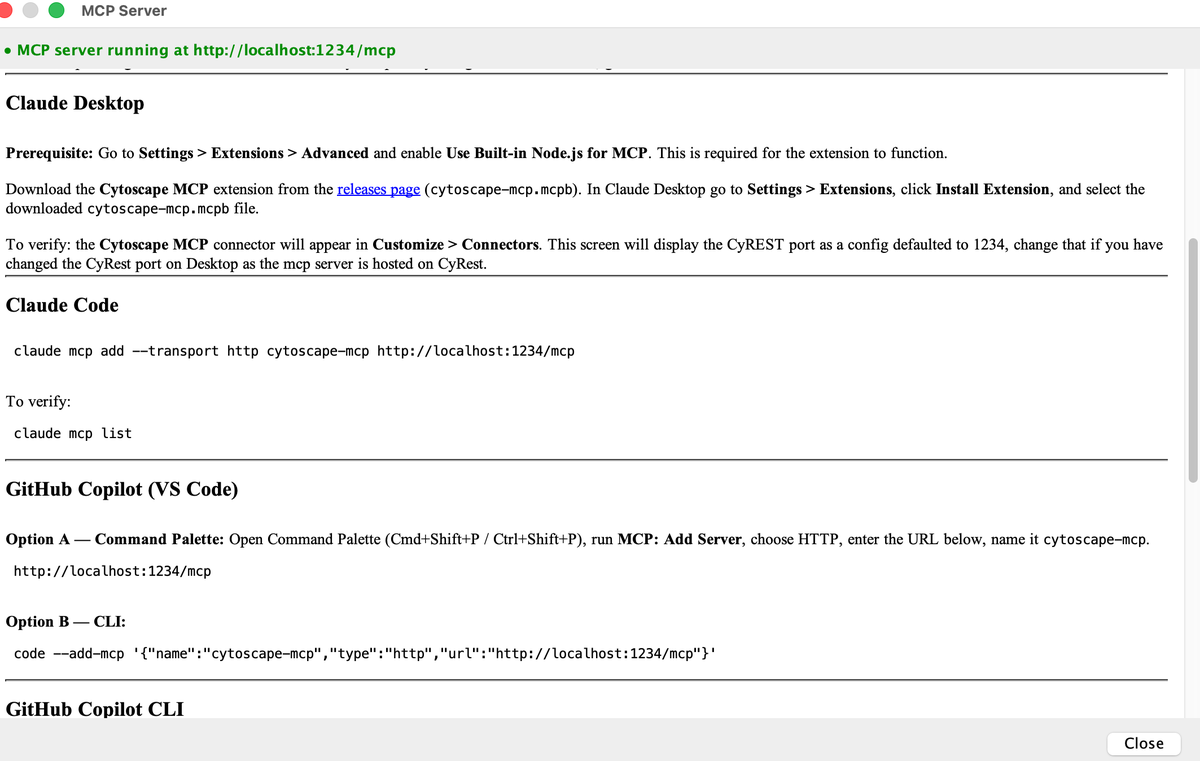
MCP Server dialog shows the live URL for your running instance, along with
the setup commands for each supported agent.
Configuring your agent
There are two ways to connect, and they are not equivalent.
| Your agent | Use this |
|---|---|
| Anything supporting Streamable HTTP — Claude Code, GitHub Copilot, Codex CLI and most others | The MCP URL above, configured directly. Nothing to install and no extra process. |
| Claude Desktop | The Cytoscape MCP extension (.mcpb), which bundles a small stdio-to-HTTP bridge. Desktop extensions speak stdio, so the bridge is required there. |
Both reach the same MCP server inside Cytoscape. If your agent can take a URL, give it the URL.
Claude Desktop. First go to Settings → Extensions → Advanced and
enable Use Built-in Node.js for MCP — the extension will not function
without it. Download cytoscape-mcp.mcpb from the project’s releases page,
then in Claude Desktop go to Settings → Extensions, click Install
Extension, and select the downloaded file. To verify, look for the
Cytoscape MCP connector under Customize → Connectors; that screen
exposes the CyREST port as a setting, defaulted to 1234, which you should
change if you changed the port in Cytoscape.
Claude Code.
claude mcp add --transport http cytoscape-mcp http://localhost:{rest.port}/mcp
Verify with claude mcp list.
GitHub Copilot (VS Code). Open the Command Palette
(Cmd+Shift+P / Ctrl+Shift+P), run MCP: Add Server, choose HTTP,
enter http://localhost:{rest.port}/mcp and name it cytoscape-mcp. Or from
a terminal:
code --add-mcp '{"name":"cytoscape-mcp","type":"http","url":"http://localhost:{rest.port}/mcp"}'
GitHub Copilot CLI.
copilot mcp add --transport http cytoscape-mcp http://localhost:{rest.port}/mcp
Verify with copilot mcp list.
OpenAI Codex CLI.
codex mcp add cytoscape-mcp --url http://localhost:{rest.port}/mcp
Verify with codex mcp list, or type /mcp inside the Codex TUI.
Verifying the installation
Check Cytoscape first, then the agent.
The MCP button is present and green. Look at the bottom-left corner of the Cytoscape window for a bold MCP button. Green means the server started and is ready. Red means it is not responding — confirm Cytoscape is running and that CyREST is active.
The MCP Server dialog opens. Click the button. A dialog titled MCP Server should open, headed by a green line reading MCP server running at followed by the endpoint URL for your running instance, and listing the connection instructions for each supported agent.
The health endpoint answers.
curl http://localhost:{rest.port}/mcp/healthYou should see:
{"status":"ok","transport":"mcp-streamable-http"}A “connection refused” error means Cytoscape is not running, or the port is not the one you used.
The agent reports a connection. Most agents have a
/mcpcommand or an MCP settings panel listing each configured server, whether it is connected, and which tools it publishes.cytoscape-mcpshould appear there as connected.A prompt reaches Desktop. Ask the agent:
> open a network using cytoscape desktop
The network should appear in Cytoscape’s Network panel and render in the main canvas, and the tool call should be listed under View → Show Task History.
Warning: Cytoscape is a single-user application with shared session state. The transport supports several agents connected at once, each with its own session, but they can issue conflicting commands — two agents changing the current view, for instance. Running more than one agent against a single Cytoscape instance is not recommended, and coordinating them is your responsibility.
27.2. MCP
The Model Context Protocol (MCP) is an open standard that describes how an AI application talks to an outside system. The outside system runs an MCP server that publishes a set of tools — named operations with typed inputs and outputs, each carrying a description written for a language model to read. The agent discovers those tools, decides which ones your request calls for, and invokes them. Because the protocol is shared, any MCP-capable agent can talk to any MCP server.
Because the Cytoscape MCP Server is not a core app, it is versioned separately and does not update along with Cytoscape — worth remembering when the tools an agent sees do not match what this chapter describes.
NOTE: This app is experimental. The tools it publishes and the way they behave are subject to change.
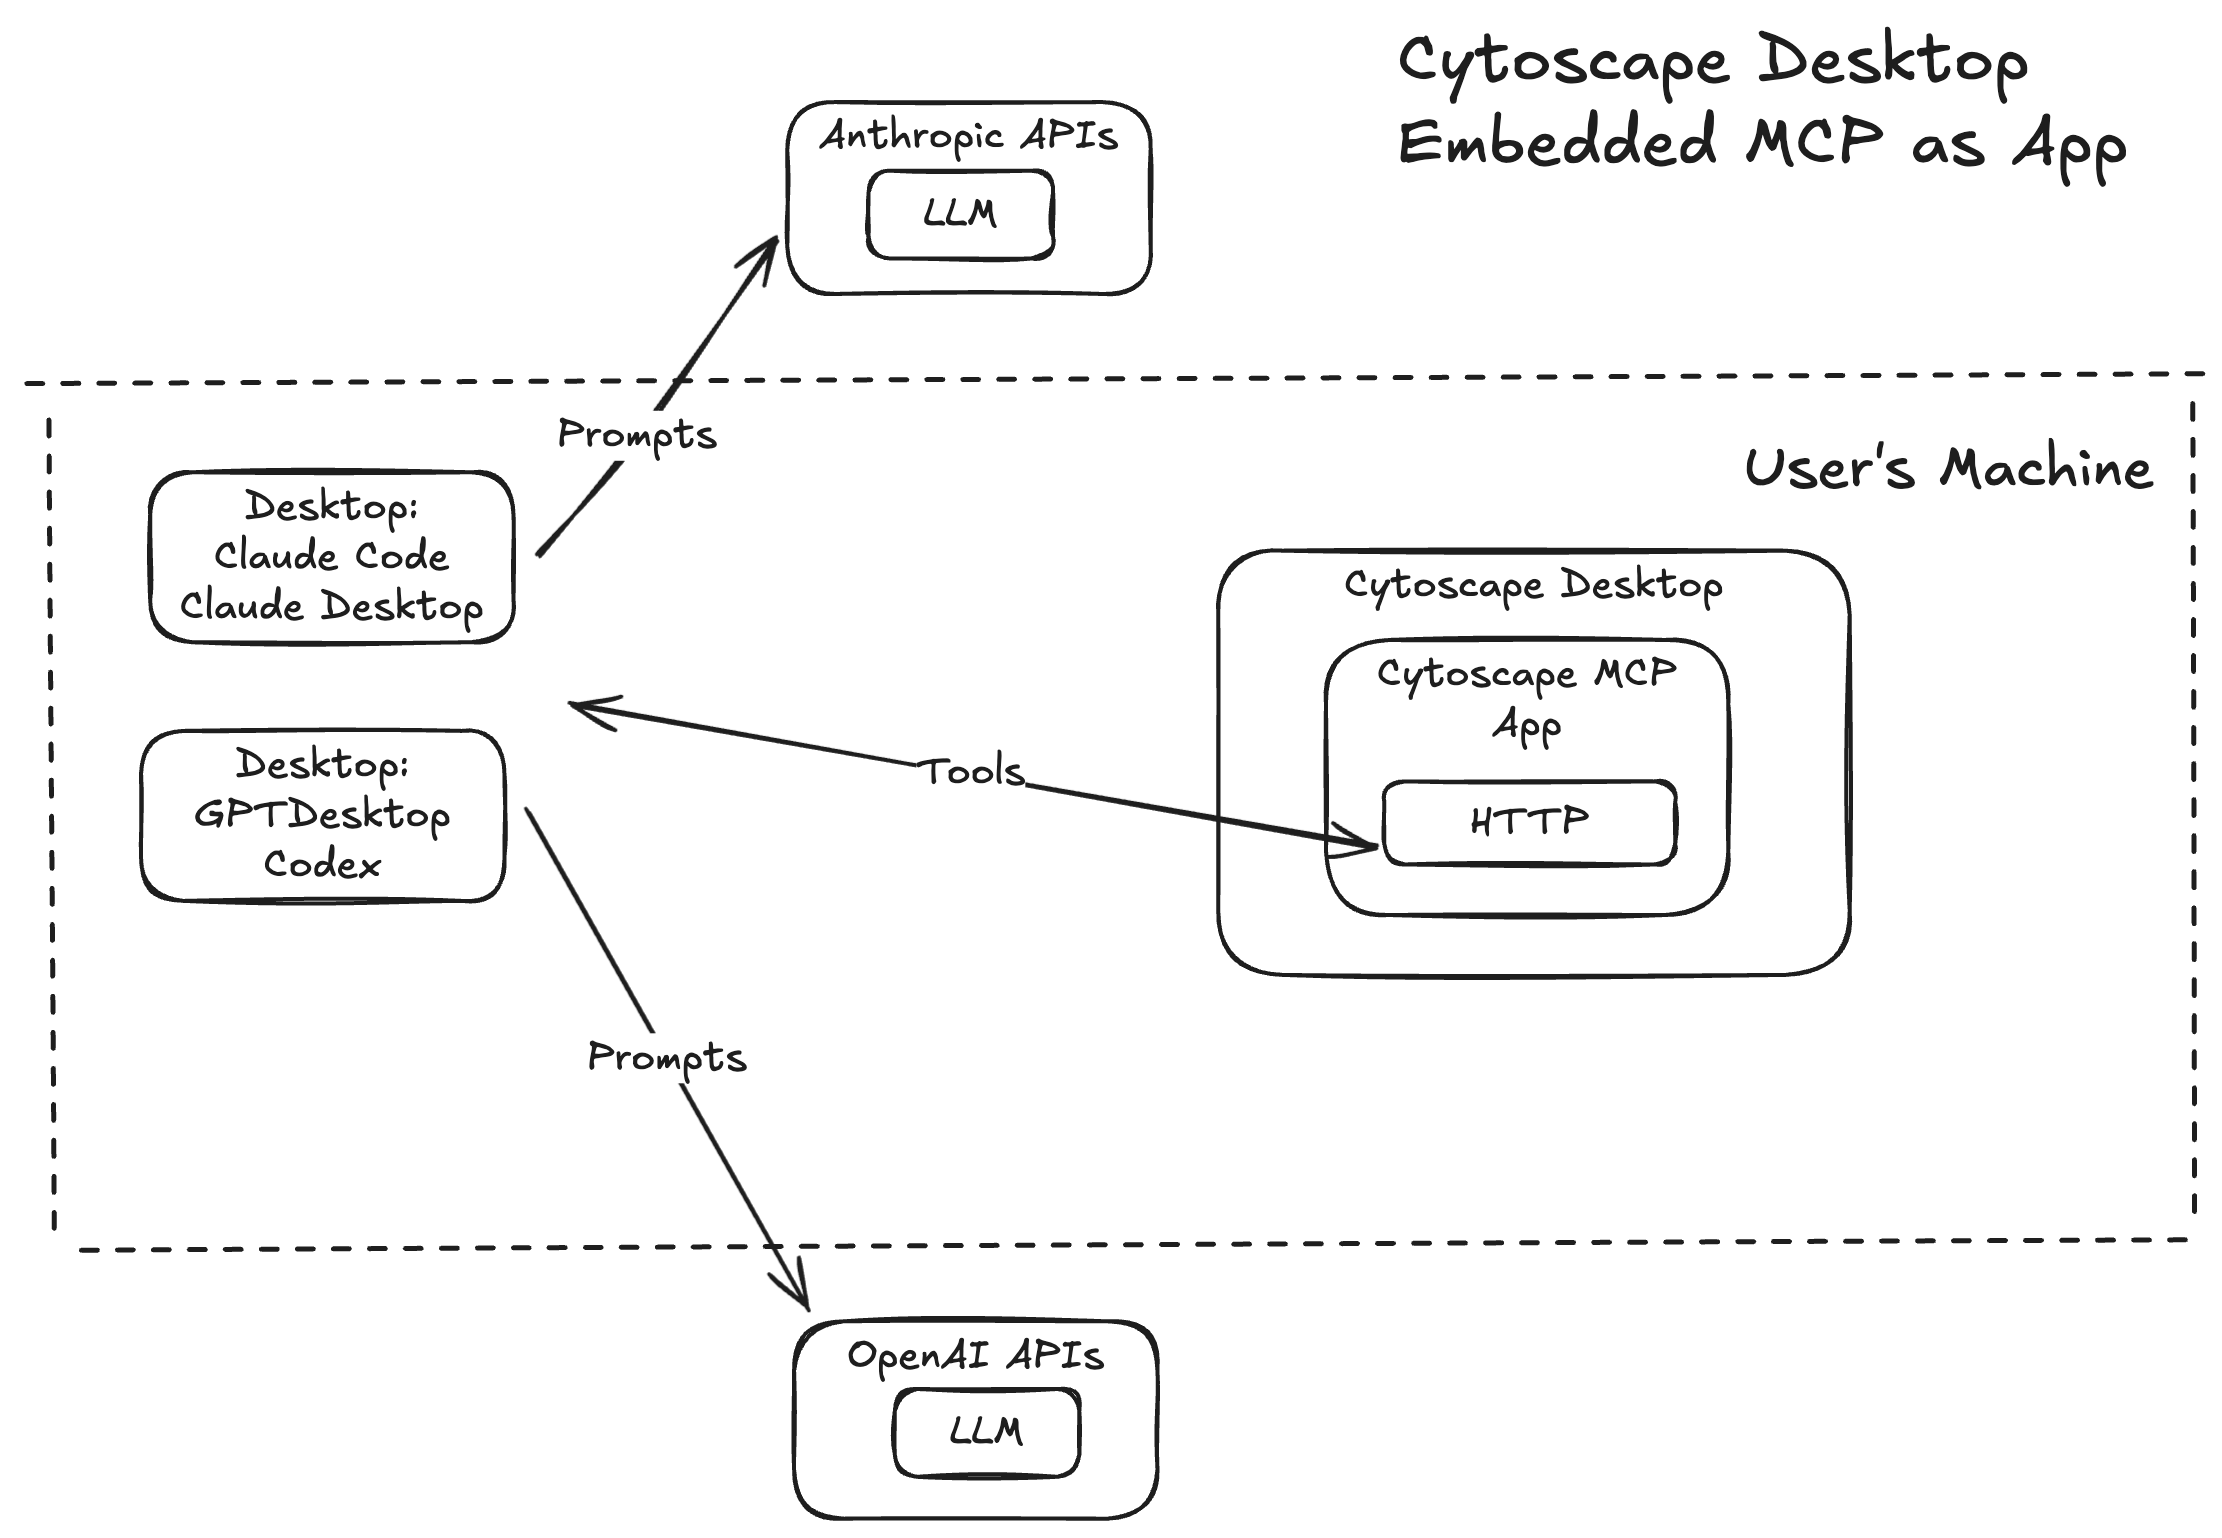
Once installed, the app publishes an MCP endpoint inside Cytoscape’s
existing CyREST HTTP server. No separate process is started and no
additional port is opened — the endpoint lives at /mcp on the port CyREST
already uses. Agents connect to it over the Streamable HTTP transport.
(The older SSE transport was deprecated in February 2025 and is not
supported.)
The app also adds two indicators to the Cytoscape Desktop interface:
The MCP status button. A bold MCP button appears in the bottom-left status bar. The label is green when the MCP server is running and ready for connections, and red when it is not responding. Clicking it opens the MCP Server dialog, which shows the live endpoint URL and connection instructions for each supported agent.

Task History entries. Every MCP tool invocation is recorded in the Cytoscape Task History window, opened from View → Show Task History. Each entry is a progress or status line reported by the tool as it runs, and identifies the tool by its internal class name rather than by the name the agent used. It is still the record of what an agent actually did to your session, and the first place to look when a result is not what you expected.

The entries above are from an agent asked to search NDEx: the gateway invoked CyNDEx-2’s
ndex search networkscommand, which reported its progress and then the number of matches it found.
What the tools cover. The published tools span most of what you would otherwise do by hand:
Loading a network as a new collection and view — from NDEx by network ID, from a network file (SIF, GML, XGMML, CX, CX2, GraphML, SBML, BioPAX), or from a delimited or Excel file with column mapping.
Listing the loaded network views, switching the current view, and creating a view for a network that lacks one.
Analyzing a network, listing the available layout algorithms, and applying one.
Reading and setting visual style defaults, listing styles and switching between them.
Creating discrete, continuous and passthrough mappings, including inspecting a column’s range or distinct values first to choose sensible mapping points.
Inspecting a tabular file’s columns and importing it into a node, edge or unassigned table.
Alongside those, three command gateway tools give an agent access to the entire catalog of Cytoscape commands registered on your machine: one searches the catalog with a full-text query, one retrieves a command’s full argument schema, and one invokes it. The three are used in that order by design: the gateway refuses to invoke a command whose schema has not been retrieved first, which stops an agent from guessing at argument names.
This matters more than it might sound. Installing another Cytoscape app registers that app’s commands with Desktop, and the gateway picks them up automatically — so an agent’s reach grows with the apps you install, with no change to the MCP app itself. The walkthrough under Agent Usage is a worked example: the agent reaches NDEx through a command the gateway found, not through any built-in NDEx tool.
The tool catalog. You never call a tool by name. Every tool is activated by natural language: you describe what you want, and the model selects the tool from the descriptions it was given. A complete, human-readable catalog of every tool registered on the server is available for reference, listing each tool’s full JSON input and output schema along with three or four example prompt snippets showing the phrasing that activates it. Consult it when a request is not producing the operation you expected — the example phrasings are the fastest way to find wording that works.
You can obtain the catalog three ways:
While Cytoscape is running, from the server itself:
curl http://localhost:{rest.port}/mcp/manifestor open that URL in a browser.
From the app’s repository: MCPManifest.md (https://github.com/cytoscape/cytoscape-desktop-mcp/blob/main/MCPManifest.md)
From your agent, using its
/mcpcommand or its MCP settings panel, which lists the tools currently published by each connected server.
Further reading. The app maintains its own documentation — a user manual, a tutorial, agent configuration details and an FAQ — which goes into more detail than this chapter and is updated with each release: github.com/cytoscape/cytoscape-desktop-mcp (https://github.com/cytoscape/cytoscape-desktop-mcp)
Agent Usage
How prompting works
You do not name tools. You describe what you want, and the model chooses.
What makes the difference is naming Cytoscape and being specific about the intent. A prompt like “open a network using cytoscape desktop” is enough for the model to reason over the whole tool set and assemble a sequence: it will ask which source you mean, load the network from it, create a view, and set that view as current — several tool calls from one sentence, each appearing in turn in the Task History.
Here is that pattern in practice, from Claude Code connected to Cytoscape:
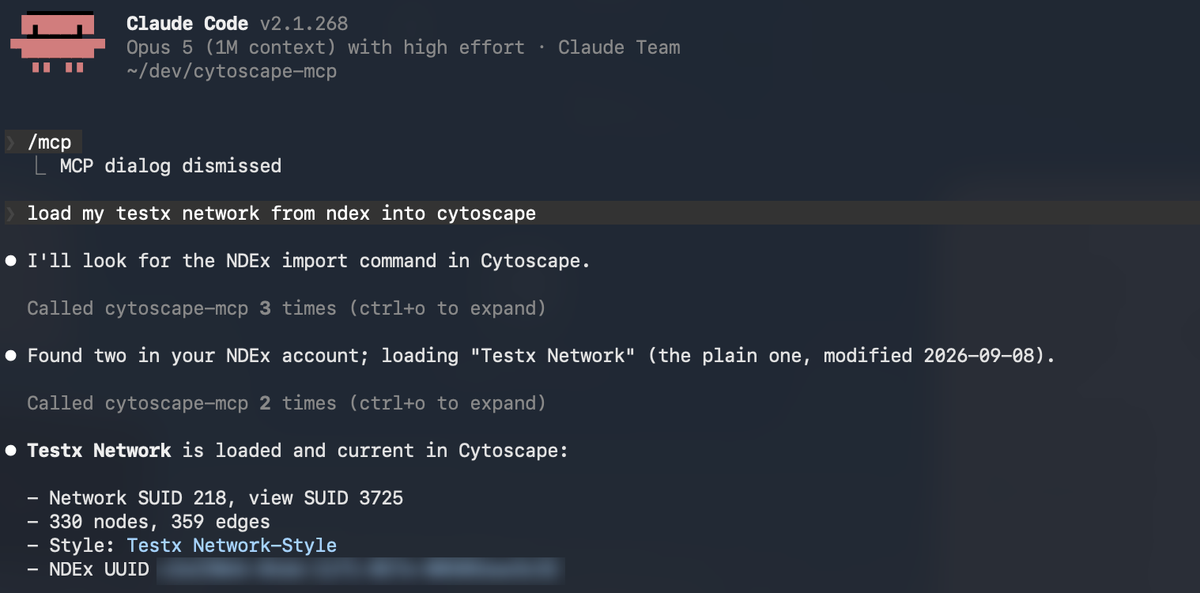
One sentence — “load my testx network from ndex into cytoscape” — became two rounds of tool calls. The agent first searched the command catalog for the NDEx import command, then used the signed-in profile to look up networks by that name, found two candidates, chose between them on their modification dates, and loaded the result. It then reported back what Cytoscape actually holds: the network and view identifiers, the node and edge counts, the style applied, and the NDEx UUID now recorded against the network.
Two things in that exchange are worth drawing out. The word “my” is doing real work — it resolves through the CyNDEx-2 sign-in profile configured in Cytoscape, which is what the NDEx section below covers. And the agent did not have a purpose-built “load from NDEx” tool: it found CyNDEx-2’s command through the gateway, which is the mechanism described earlier in this chapter.
Vague or unqualified requests are the usual reason nothing happens. “Change the colours” gives the model nothing to match against; “change the network node color to green in cytoscape” does. When a request is not producing the operation you expect, consult the tool catalog — every tool carries example prompt snippets showing phrasing known to activate it.
Example prompts
These are drawn from the app’s App Store listing and are a reasonable starting vocabulary.
| Prompt | What happens in Cytoscape |
|---|---|
| open a network using cytoscape desktop | The agent asks which source you mean — NDEx, a network file or a tabular file — loads it as a new collection, and makes its view current. |
| analyze the network in cytoscape | Runs network analysis on the current network and reports the resulting statistics. |
| change the network layout | Lists the available layout algorithms, then applies the one you pick to the current view. |
| switch network style | Lists the styles in the session and switches the current view to the one you choose. |
| increase the network edge width by 1 | Reads the current edge width default and sets a new one. |
| change the network node color to green | Sets the node fill colour default on the current style. |
| change node label to courier new | Sets the node label font default. |
| lock node width and height on network | Turns on the node width/height dependency so the two stay equal. |
| import new attributes into the node table of my network in cytoscape | Inspects the file's columns, confirms the key column and the network column to match on, and imports the table. |
| map edge shape to interaction | Creates a discrete mapping from the interaction column to edge shape. |
| map weight to node size | Creates a mapping from the weight column to node size, locking width and height together. |
| generate green colors on edges based on discrete values of confidence | Reads the distinct values of confidence and generates a discrete colour mapping across them. |
| set color gradient on nodes from blue to red based on eccentricity | Reads the range of eccentricity and creates a continuous colour mapping over it. |
| set node label to gene1 | Creates a passthrough mapping from the gene1 column to the node label. |
Working with NDEx
NDEx, the Network Data Exchange, is where many Cytoscape users keep their networks, and an agent can work with it directly. Which networks it can reach is decided by the NDEx sign-in profile you have set up in Cytoscape, not by the agent — that is what gives a phrase like “my networks” something concrete to resolve against. With no profile configured, an agent can still search and download public networks, but not save to your account. See Export Your Data for the interactive route to the same functionality.
Example prompts. Each of these drives NDEx through the command named in the right-hand column:
| Prompt | What happens |
|---|---|
| load my ndex network xyz into cytoscape | Runs ndex download network for that network's UUID, using your selected profile, and opens it as a new network and view. |
| find ndex networks that start with ergosterol | Runs ndex search networks searchTerm=ergosterol and reports the matches with their UUIDs, owners and sizes. Note that NDEx matches the term anywhere in a network's name, description or owner rather than only at the start, so a request phrased as "starting with" still returns every network mentioning the term. |
| upload my xyz network to ndex | Runs ndex create network, saving the current network to NDEx as a new network and returning its UUID and URL. |
Tips and troubleshooting
Name Cytoscape in the prompt. “apply a force-directed layout in cytoscape” is unambiguous; “apply a force-directed layout” may not be.
Say which network you mean when the session holds several. Most tools act on the current view.
Watch the Task History. View → Show Task History is the record of what actually ran, which is the quickest way to tell a misunderstood request from a failed one.
A missing capability may just be a missing app. The command gateway only sees commands registered with Desktop. If an agent cannot find a way to do something, installing the relevant Cytoscape app registers its commands and the gateway picks them up — no change to the MCP app needed.
If the agent reports the server as unavailable, check the MCP button’s colour and the
/mcp/healthendpoint before changing any agent configuration. A red button means the problem is in Cytoscape, not in the agent.For deeper diagnostics, the server exposes its full tool catalog at
/mcp/manifest, and the app documents its diagnostic steps (https://github.com/cytoscape/cytoscape-desktop-mcp?tab=readme-ov-file#cytoscape-desktop-mcp-diagnostics) and a FAQ (https://github.com/cytoscape/cytoscape-desktop-mcp/blob/main/docs/FAQ.md).